Saturday, July 11, 2009

Ipod Cover: Version 2 ^_^

Hey you guys,

Sorry I haven't posted much on here but I had finished the modified ipod cover about a week ago and was finally able to post it.


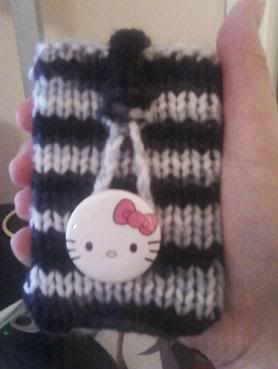
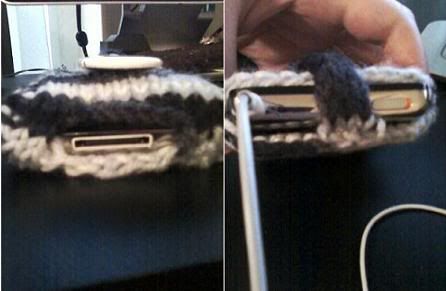
So with this one you can see it's much more functional and easier to get around. I made a long button hole on the bottom of the cover for the charger. I made a 4 rowed strap with a loop braid to go around one of my button pins. ^_^


I casted on 18 stitches like the last one but this time I only knitted 54 rows. On the 27th row knitted the first 5 stitches then I casted off the next 8. I then finished that row by knitting the last five stitched. On the next row(since I was word in stockinete stitch) I purled the first 5 stitches, casted on 8 new stitches, and purled the rest. I continued to work in stockinete fashion until casting off on the 54th row.


Finished it off by sewing the seams together and them sewed on the braided strap. Put the pin in place and there you go.

Hope you liked it.


Till next time,
Lexy

Wednesday, June 17, 2009

FO: Cell Phone Case!!!

It's rather funny how things turn out.

I was working on the modified version of my ipod cover when I realized about half way down that I casted on 12 stitches rather than 16. It wasn't going to be wide enough for my Ipod.

But I didn't want to frog it. The knitting itself was coming out too pretty to just tear apart.

So as I began to curse the idea of starting all over again my eyes fell upon my cell phone and it was like a happy dance went off in my head. I decided to use what I was knitting and turn it into a cell phone case...

Photobucket

Photobucket
(Note: For some reason this pic came out lighter than the first one. The original color likeness is more of the first one. ^_^)

So simple enough. I just kept on knitting about 50 rows and then sewed the seams at the sides. I added a pretty golden toned button on the front and, using the same yarn I used for my prior piece, created a braided cord that I sewed on the inside back of the case.

And et voila...I was done in about an hour's time.
I'm actually quite happy with this. Am using it at the moment.

So yeah, I think it's rather amusing at times how things turn out at the end...even though you were never planning on taking things that way.


Later,
Lexy

Friday, June 12, 2009

FO: Ipod Cover. I DID IT!!!

Photobucket

You guys I'm so proud of myself like you have no idea.
I just finished my first knitting piece...EVER!

And I couldn't have asked for a better outcome even if I wanted to. ^_^

Photobucket
Photobucket
Photobucket


And for those who are interested in making one here are the steps...


Materials

-A pair of 4.5mm knitting needles. (US size=7)
-Medium Weight Yarn (I used the Red Heart Super Saver with multi in red.)
-A crochet hook
-A tapestry needle
-Scissors
-Button(s) of your choice
-A sewing needle and thread


Steps

-Cast on 18 stitches.
-Work in Stockinette stitch for 70 rows.
-On the 8th row knit 7 stitches and then cast off the next 4 stitches.
-Keep knitting the remaining 7.
-On the 9th row purl 7 stitches and then cast on 4.
-Keep purling the remaining 7.
-Continue to stockinette for 61 more rows.
-Cast off neatly.
-Fold the cover and mark sides down.
-Mark on the front pocket of cover when you want your button to be and sew it in place.
-Sew the seams together.
-Add any extra buttons or decorations you'd wish to add.


------------------------------------------------------------------

This ipod cover is a modified version of the ipod cover how to vid over at videojug.com:
http://www.videojug.com/film/how-to-knit-an-ipod-cover

Thursday, June 11, 2009

HP SOCKS!!!!

Note to self: Get to these...NOW!!!

Hufflepuff:
http://knittingbykaae.blogspot.com/2008/04/hufffepuff-opskrift-pattern.html

Slytherin:
http://knittingbykaae.blogspot.com/2008/03/stytherin-intarsia-socks-are-done.html

Tom Baker Scarf from "Dr Who"

Photobucket
A challenge brought on me by strife01104 over at livejournal. He said: "
The ultimate test of your newly acquired knitting skills.....Tom Baker's scarf as Doctor #4 :)"
Well strife...I think I may just take you up on that challenge. ;)


Measurements:
Approx 270 (670)cm long

Materials:
4mm needles
3.5mm crochet hook.

8 ply (DK to the non-Aussies) wool in the following colours and amounts. Colours in brackets are for the darker colourway. Yarns are 95m/100 yards per 50gm

Small scarf:
steel blue (mid-brown): 100gm
off white (maroon): 100gm
plum (rust): 50gm
fawn (fawn): 200gm
yellow (gold): 50gm
red (dark brown): 100gm

Large scarf:
white (maroon): 450gm
steel blue (mid-brown): 250gm
red (dark brown): 250gm
plum (rust): 250gm
yellow (gold): 250gm
fawn (fawn): 750gm

Tension:
Approx 22sts and 44 rows to 10cm over garter st, though the scarf will stretch greatly when worn due to it's weight.

Method:
Using steel blue cast on 55 (80)sts.

Work in garter stitch stripes in the following colour sequence. Instructions in brackets are for the larger size. For the brown-maroon scarf substitute maroon for white, dark brown for red, rust for plum, gold for yellow and mid-brown for steel blue.

blue: 36 (108) rows
white: 12 (36) rows
plum: 10 (30) rows
fawn: 20 (60) rows
yellow: 10 (30) rows
blue: 12 (36) rows
red: 16 (48) rows
fawn: 58 (174) rows
yellow: 16 (48) rows
white: 8 (24) rows
plum: 12 (36) rows
red: 10 (30) rows
blue: 20 (60) rows
fawn: 12 (36) rows
white: 14 (42) rows
plum: 10 (30) rows
fawn: 54 (162) rows
yellow: 8 (24) rows
red: 10 (30) rows
blue: 8 (24) rows
white: 16 (48) rows
fawn: 58 (174) rows
plum: 10 (30) rows
white: 54 (162) rows
red: 10 (30) rows
blue: 18 (54) rows
yellow: 10 (30) rows
fawn: 40 (120) rows
plum: 12 (36) rows
fawn: 8 (24) rows
red: 16 (48) rows
white: 34 (102) rows
yellow: 10 (30) rows
fawn: 20 (60) rows
plum: 8 (24) rows
red: 12 (36) rows
yellow: 10 (30) rows
fawn: 16 (48) rows

Cast off neatly.

Making Up:
Neatly sew in all loose ends.
Cut 60cm lengths of yarn in the following colours:
fawn, red, yellow, plum, blue.
Make fringe on cast on and cast off ends with one strand of each colour in each tassel.
Trim neatly, measuring as you go to keep the fringe even.


Original knitting source:
http://www.knitting-and.com/knitting/patterns/drwho/drwhoscarves.htm

Ipod Cover WIP

Hey you guys.
I'm so excited about my first knitted piece. I'm working on a cover for my ipod.

Photobucket


I'm still about only 1/3 done but so far so good.

This one is a just like the one in the How to Make an Ipod Cover vid over @ videojug except instead of a decorative button I'm adding a functional one.
(Notice the button hole on the bottom of the project.)

You guys have no idea how proud I was of myself when I was able to actually make that button hole. lol. I even did a little happy dance around my room when I saw that I got it on the first shot.

I'll post pictures soon when it's finished.

Like I said...I'm really excited about this project. Being my first knitting piece EVER I was starting to feel a bit overwhelmed about it. I can be pretty ambitious and at times take on things I just might not be ready for.

But now I'm actually starting to believe that I can really do this. ^)^
Welcome!

My name is Lexy and I have decided to make an online journal about my newly discovered lover for knitting. ^_^ Who knew I'd actually be good at it?)

I'm starting out basic but I've already learned how to cast on, knit, purl, stockinette, rib stitch, and cast off. My current project (an ipod cover) is a small one for beginners.
ou guys.


As a starter here's the links to the vids that had started it all for me:

http://www.videojug.com/film/how-to-cast-on-2

http://www.videojug.com/film/how-to-knit-the-knit-stitch

http://www.videojug.com/film/how-to-knit-the-purl-stitch

http://www.videojug.com/film/how-to-knit-the-ribstitch

http://www.videojug.com/film/how-to-cast-off